Tech Stack Refresh: My Blog's 2023 Updates
It has become a bit of a tradition for me to make significant changes to my blog every year, even though it wasn't part of my original plan. I began my blog using technologies like Jekyll, then moved to Gatsby, and later to Next, with each migration requiring a complete overhaul of the user interface.
This blog means a lot to me, it's like my personal project where I share my learnings (although I should share more often 🙂). It's also like a "laboratory" where I can experiment and test new technologies. So this year, I've been focusing on updating the technologies that the blog uses. Let's take a look at what I've done so far!
Seizing Opportunity
Typescript
Being a small project maintained solely by myself, I never felt the need to use Typescript (and that feeling remains unchanged). However, since I was going to migrate all the files to support RSC (React Server Components), I saw this as a good opportunity to migrate the codebase to Typescript as well...
Another good reason behind this decision was that I wanted to test the new Statically Typed Links of Next 13 (still an experimental feature as I write this post).
The migration was not as difficult as I thought it would be. I just needed to install the typescript package and create a tsconfig.json file. Then I needed to rename all the files from .js to .ts and fix all the errors. 😅
Tailwind
The same happened with Tailwind. In its documentation, Tailwind has the following definition of how it works:
"Tailwind CSS works by scanning all of your HTML files, JavaScript components, and any other templates for class names, generating the corresponding styles, and then writing them to a static CSS file.
It's fast, flexible, and reliable — with zero runtime."
Tailwind's methodology simplifies the styling process by directly mapping class names with CSS properties, eliminating the need to write custom CSS. Consequently, this significantly enhances efficiency, particularly within smaller projects (like this blog).
Next.js (and Vercel) new features
React Server Components
I must admit that the main reason for all the work I've done is to test and make my blog available using the new RSC (React Server Components) with the new App Dir from Next.js 13. I waited for a while to do this migration and finally did it when Next.js reached version 13.4.0.
next/font
In Next.js v13.0.0, a new next/font package was introduced. This package offers an improved font system that enables us to load fonts more efficiently by eliminating external network requests. Additionally, it provides access to the complete Google Fonts library since these fonts are already included in the package.
On my blog, I'm using two fonts, Inter and Fira Code. To make use of these fonts, all I had to do was import them and pass the required options:
import { Inter, Fira_Code } from 'next/font/google'

const inter = Inter({
  subsets: ['latin'],
  variable: '--font-inter',
  display: 'swap',
})

const fira_code = Fira_Code({
  subsets: ['latin'],
  variable: '--font-fira-code',
  display: 'swap',
})
vercel/og
In the Next.js v13 release Vercel also launched the new library @vercel/og that works seamlessly with Next.js to generate dynamic social cards. This is a great feature for blogs and other websites that need to generate social cards for each page.
In some of my older posts, I wrote about how I used to create dynamic social cards. But I've switched over to using the Vercel library solution because it's more solid and much easier to use. The way they do it is by using Vercel Edge Functions and WebAssembly to turn HTML and CSS into images, and they also make use of the React component abstraction.

Contentlayer
Before discovering Contentlayer, I used to handle markdown files in my blog using the fs to read the files, the gray-matter package to parse the front matter, and the remark and rehype packages to parse the markdown content. Although this approach was working well, I was looking for a more robust solution.
Fortunately, I came across the Contentlayer package which is a zero-config, zero-runtime, blazing-fast content layer for Next.js. It's a great solution for handling markdown files, and it's very easy to use.
Beautiful code blocks
In the Contentlayer configuration, there is an option to add MDX plugins easily. One of the plugins that I use is rehypePrettyCode, which is a syntax highlighter that creates beautiful code blocks. There are some really cool themes you can choose from. I went with the github-dark theme, which is the same one I use in my code editor.
[
  rehypePrettyCode,
  {
    theme: 'github-dark',
    keepBackground: false,
    onVisitHighlightedLine(node) {
      node.properties.className.push('line--highlighted')
    },
    onVisitHighlightedChars(node) {
      node.properties.className = ['word--highlighted']
    },
  },
],
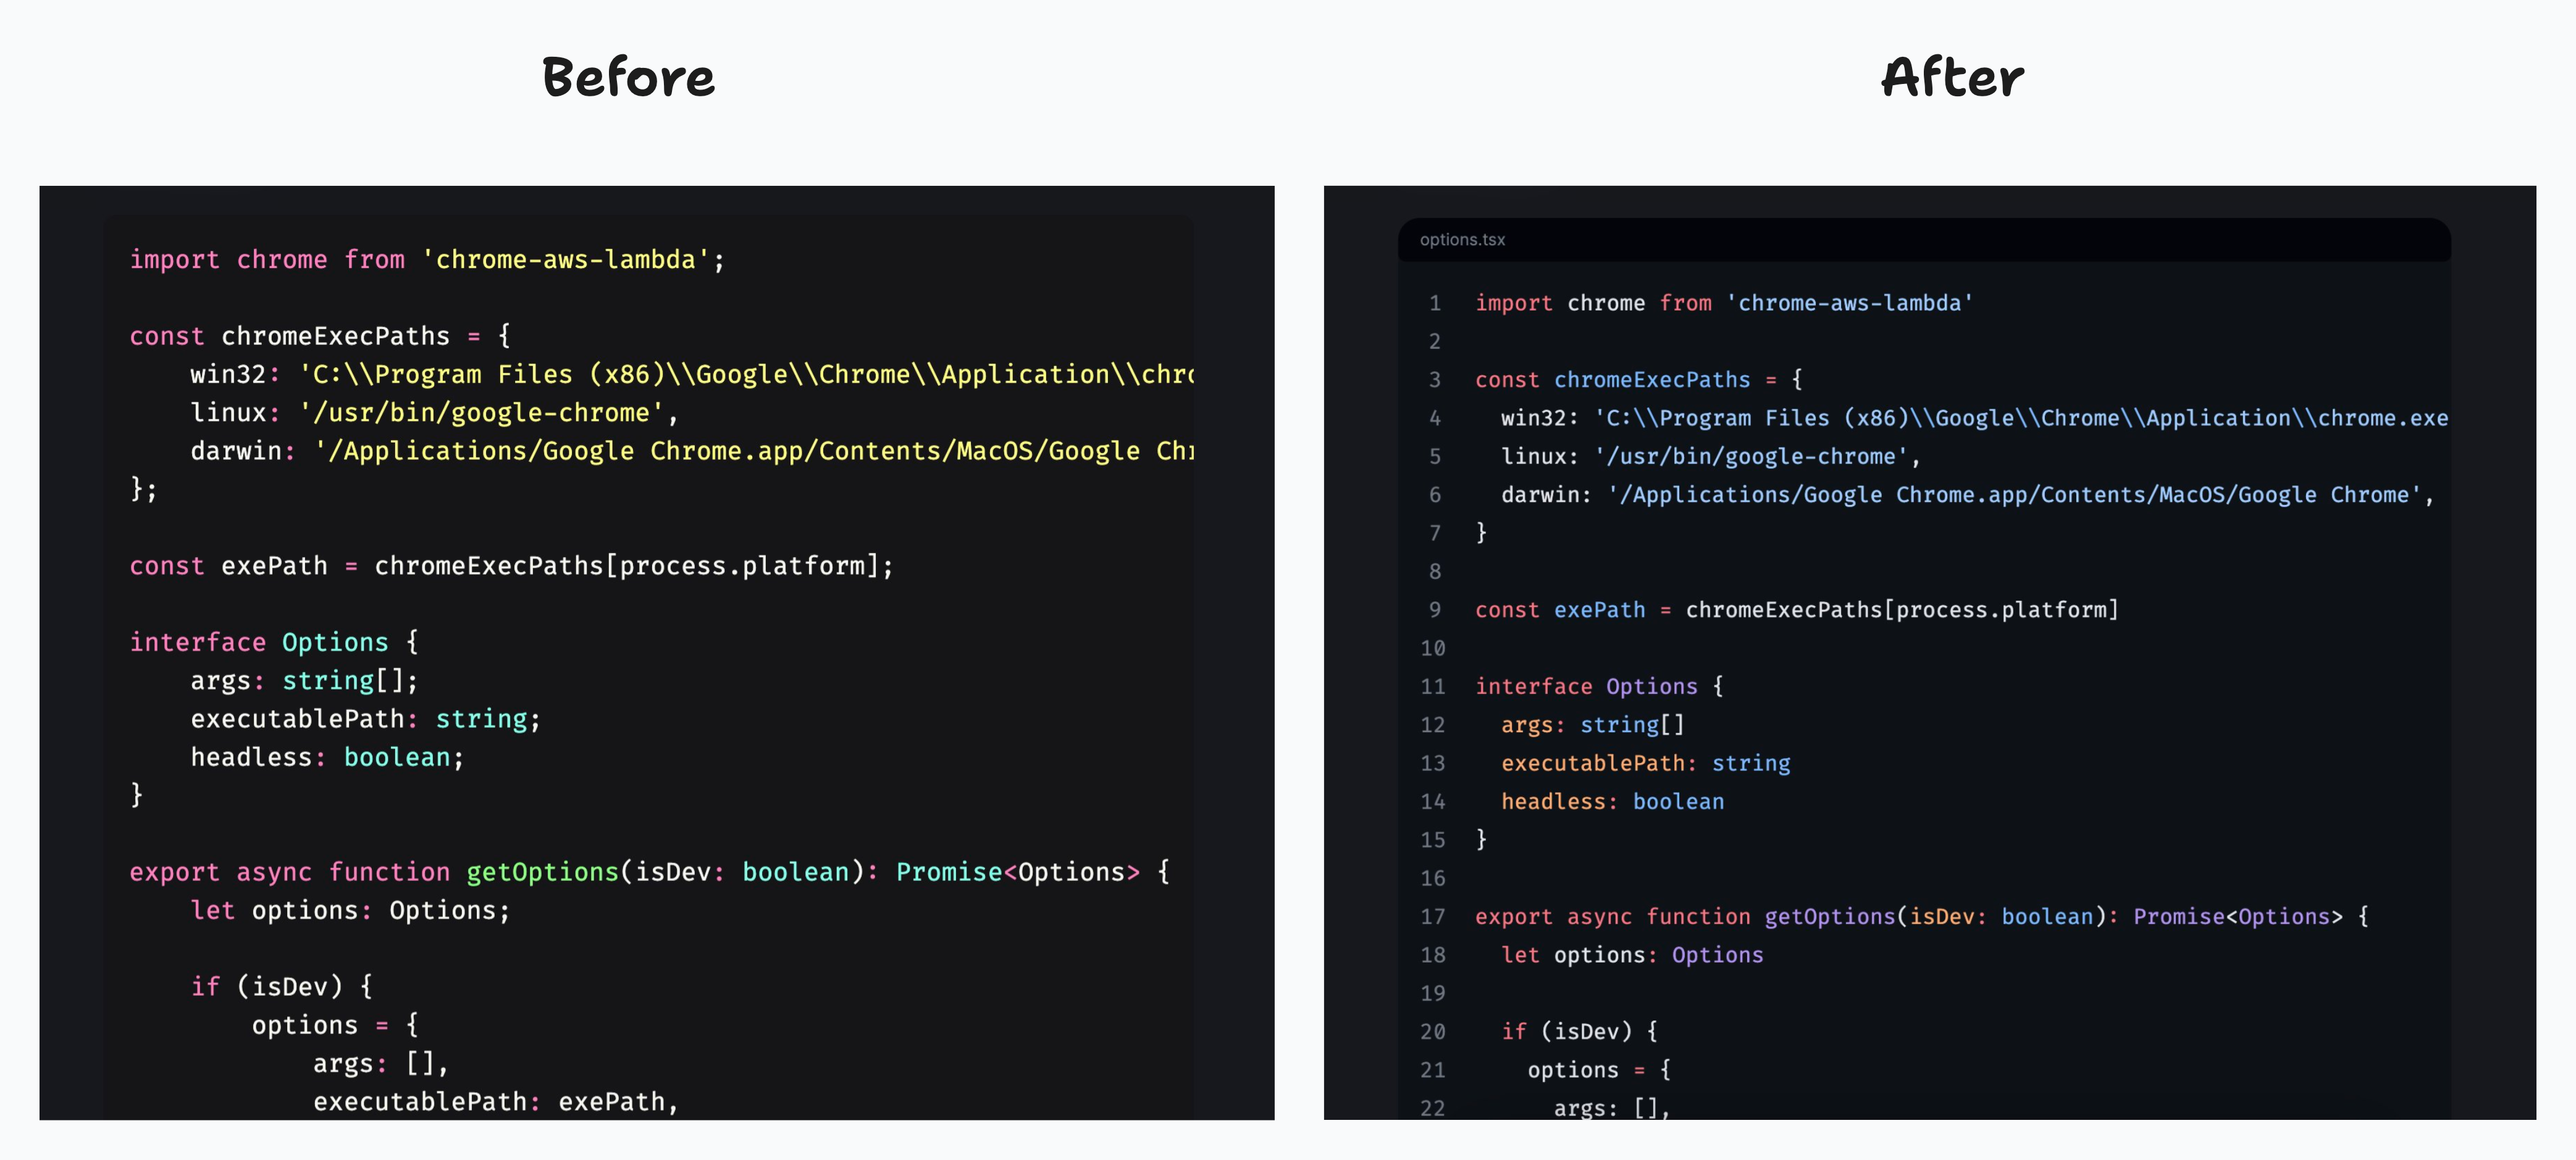
I made some changes to the code blocks to make them cooler. Now they have a file title in the code block, highlight specific lines or code, and are styled in a better way. To make it easier to read the code, I added line numbers too. This makes the code blocks look like a proper code editor. I used CSS to make it all happen. Here's the code I used to add line numbers:
code[data-line-numbers] {
  counter-reset: lineNumber;
}

code[data-line-numbers] [data-line]::before {
  counter-increment: lineNumber;
  content: counter(lineNumber);
  display: inline-block;
  text-align: right;
  margin-right: 1.5rem;
  margin-left: -0.75rem;
  width: 1rem;
  color: #6d7681;
}
See the comparison between before and after:

Conclusion
I'm super happy with how the migration turned out! Did you enjoy reading about the changes I made to my blog? That's all for now but I've already got some cool new features in mind for the future. If you've got any ideas, let me know! 😄